Troubleshooting
In this section there are some tips to solve known problems. This section will be updated over time based on the major problems encountered by users. Problems related to Extreme PBR bugs are usually solved. Here are some of the most common problems. Question and answer
I do not receive mail from BlenderMarket
Make sure you consented to receive emails from creators in your Blender Market account preferences: https://blendermarket.com/account/privacy-center/consents
Relink Libraries
If for some reason, for example:
You moved the Extreme PBR libraries to another folder
You copied the Extreme PBR libraries to another computer
You have to indicate the paths of the Extreme PBR libraries which are usually 2 folders called respectively:
EXTREME_PBR_DEFAULT_LIB (Extreme PBR default library)
EXTREME_PBR_USER_LIB (Extreme PBR User Library, which could also be empty, since it is the one where you can save your personal libraries)
So go to edit--> Preferences--> Addons--> Extreme PBR --> Libraries
Now indicate the paths to the folders mentioned above.
See also
Here is the link to the page that refers to the libraries section: Libraries
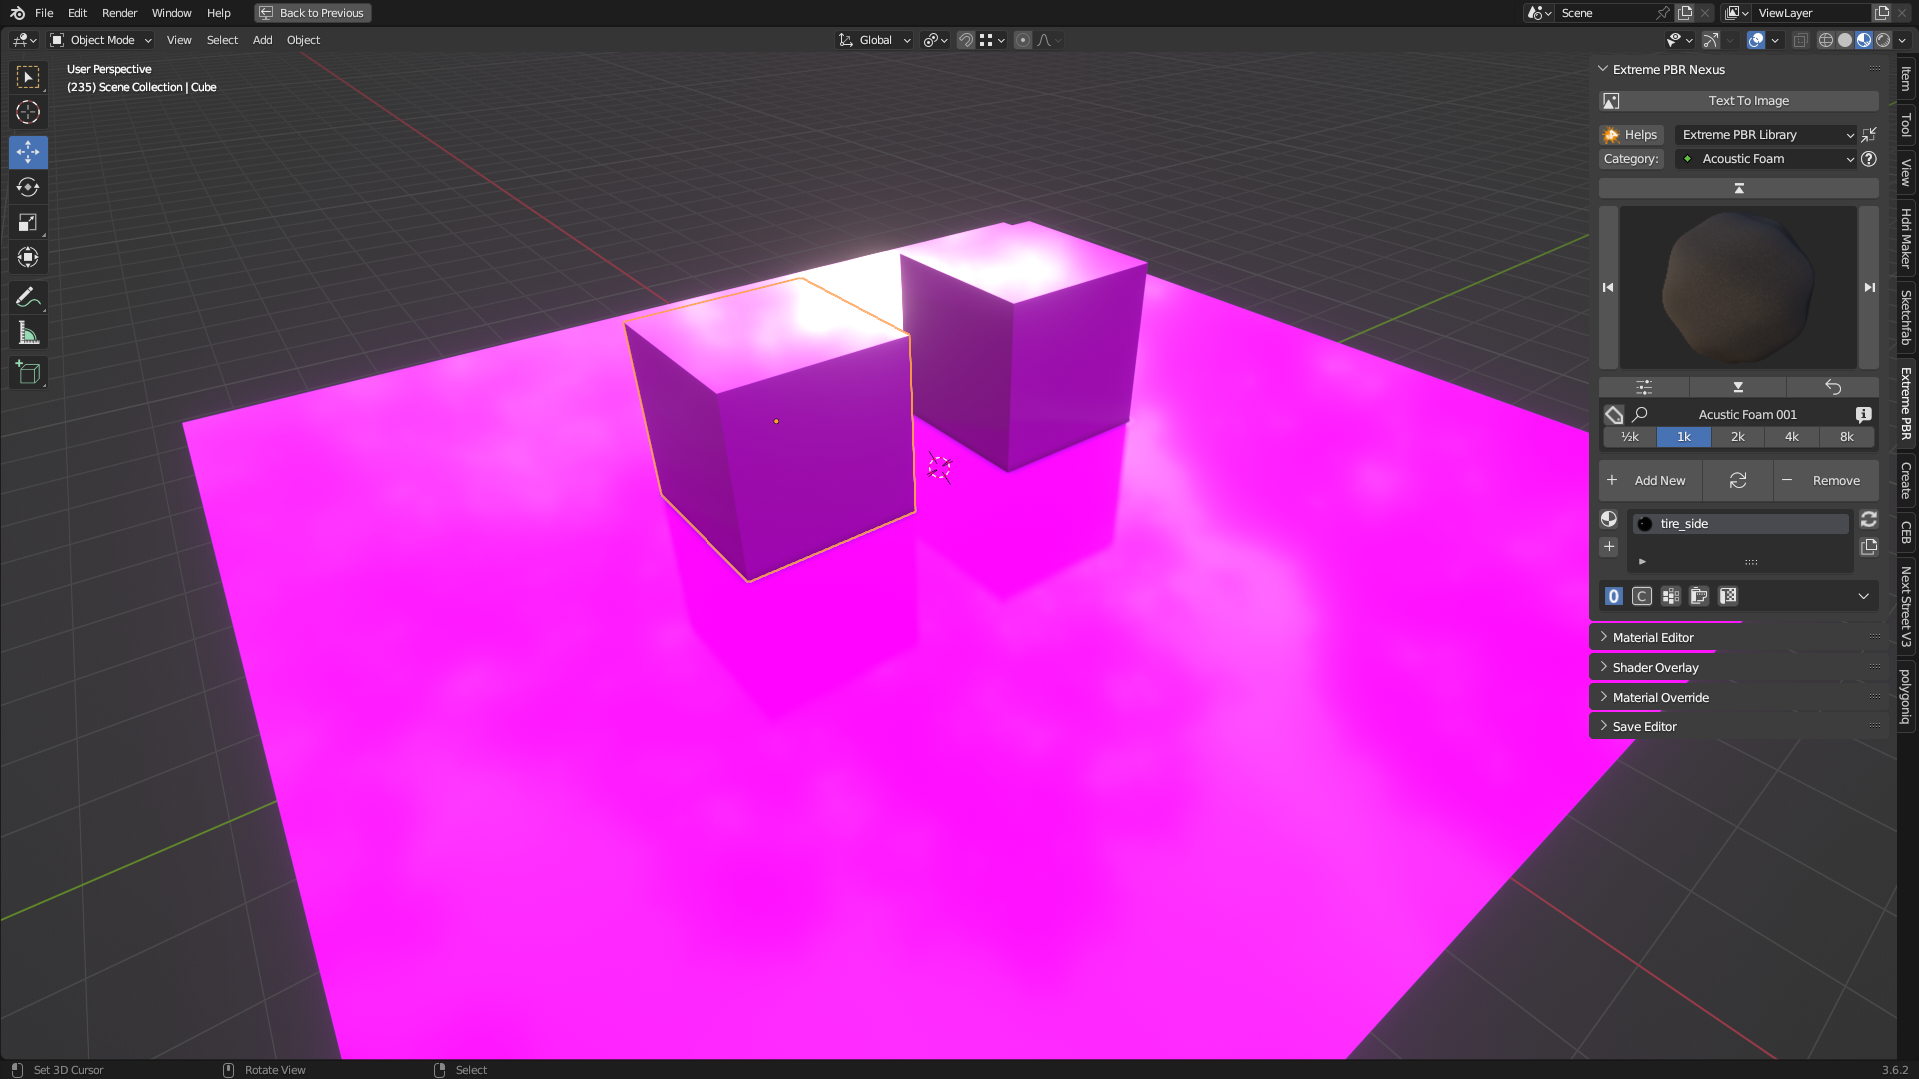
Pink Materials
It may happen that there are files that referred to the material that have been moved, so the material no longer has a reference image.
Here’s how to do it: Find Lost Images
Black Materials
In this case there may be a problem when creating a file in a newer version of Blender, and then after saving the project it is opened in a previous version of Blender.
Sometimes Blender updates its nodes, so it may be that the nodes are no longer retro compatible with the previous version. To solve this I have provided a function that tries to replace the “Unknown” nodes
You can find it in the Extreme PBR Options menu in this paragraph: Adjust All Material Node Tree
Moving libraries to another computer
To move the libraries to another computer, just copy the “EXTREME_PBR_DEFAULT_LIB” and “EXTREME_PBR_USER_LIB” folders
If once connected the libraries from the “Libraries” menu in Extreme PBR preferences the addon does not work, it could be that in the folders mentioned above, the “._data” folders are missing, so make sure they are inside each library.
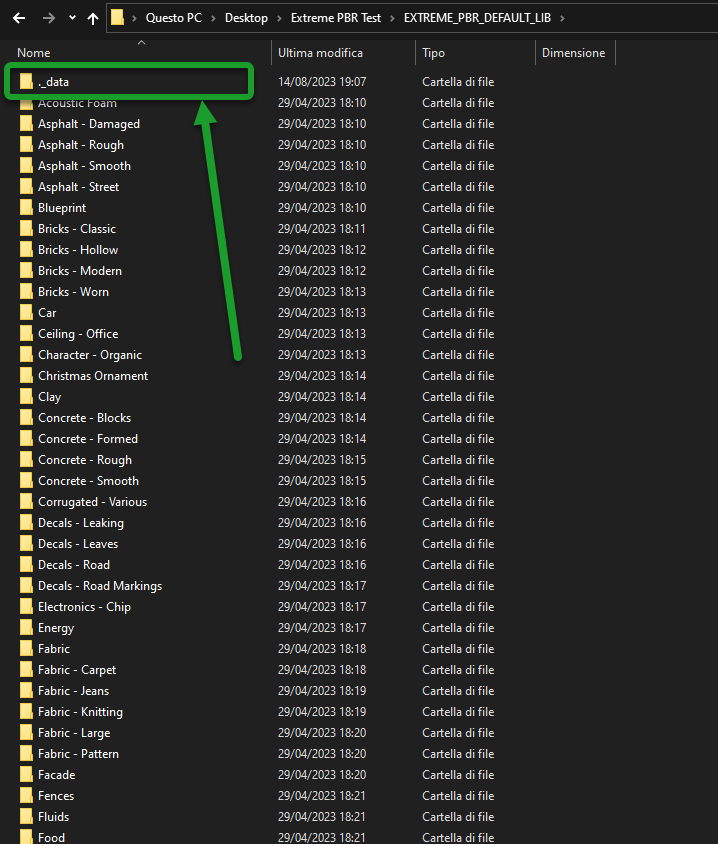
To Show the hidden folders in Windows:
Open File Explorer from the application bar.
Select View > Options > Modify folder and search options.
Select the View tab and in Advanced settings, select Show hidden folders, files and drives and OK.
To Show the hidden folders in Mac:
Access the folder where you think there are hidden files.
Step 2: Press the keys “Command + Shift + (.)”
Or:
In Finder, open up your Macintosh HD folder
Press Command+Shift+Dot
Your hidden files will become visible. Repeat step 2 to hide them again!
To Show the hidden folders in Linux:
Press the menu button in the top-right corner of the window and select Show Hidden Files, or press Ctrl+H.
Why if I export the project to another computer I can no longer see the materials?
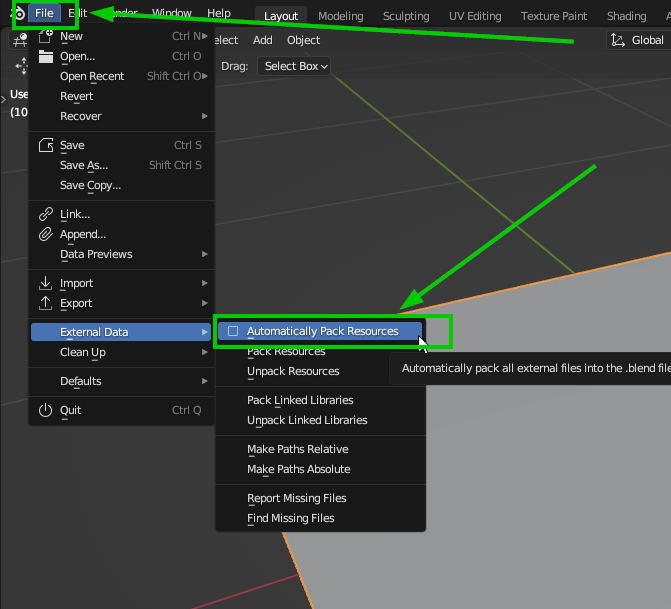
This is quite normal, by default blender does not package images in .blend files, to do this you have to go to
File > External Data > Automatically Pack Resources
Then save the project, and finally you can move it to any other computer. It will contain all the images you used.
Pay attention to this, because your .blend files after these operations will contain all the image files present in your project is present an image of 100MB (For example) your .blend file will become 100MB more.
What has changed from 4.0.X series to 4.1.X series?
From 20-08-2023
The new features and changes described here: Updates Log
The important change that occurs in the new Extreme PBR 4.1.x series is the fact that now the libraries are in .exapack format, this is a format for distributing the files of the library (Just like in HDRi Maker) that allows you to install the libraries in a simple and fast way.
Important
The change of course towards the distribution of libraries in .exapack format took place for 2 substantial reasons:
Some users found that having to register for free on Extreme-Addons.com to be able to download the libraries was a nuisance (And I understand it)
In some parts of the world, the server speed for downloading libraries was slow (In any case on request I have already provided the libraries several times via an alternative download. This was the most annoying of the problems and I understand how annoying it was to contact me for this.
So for this reason I decided to keep the download service active for those who wanted to continue using it but substantially I’m trying to move towards the .exapack format.
My consideration:
I apologize for the server speed inconvenience, but I really did my best to solve the problem with those who are managing the site for me at the moment.
With this distribution system you will no longer need to download the libraries from Extreme-Addons.com and consequently there is no need to register on it
Fix Materials of Extreme PBR created with the version of Blender 3.x.x in Blender 4.x.x or vice versa
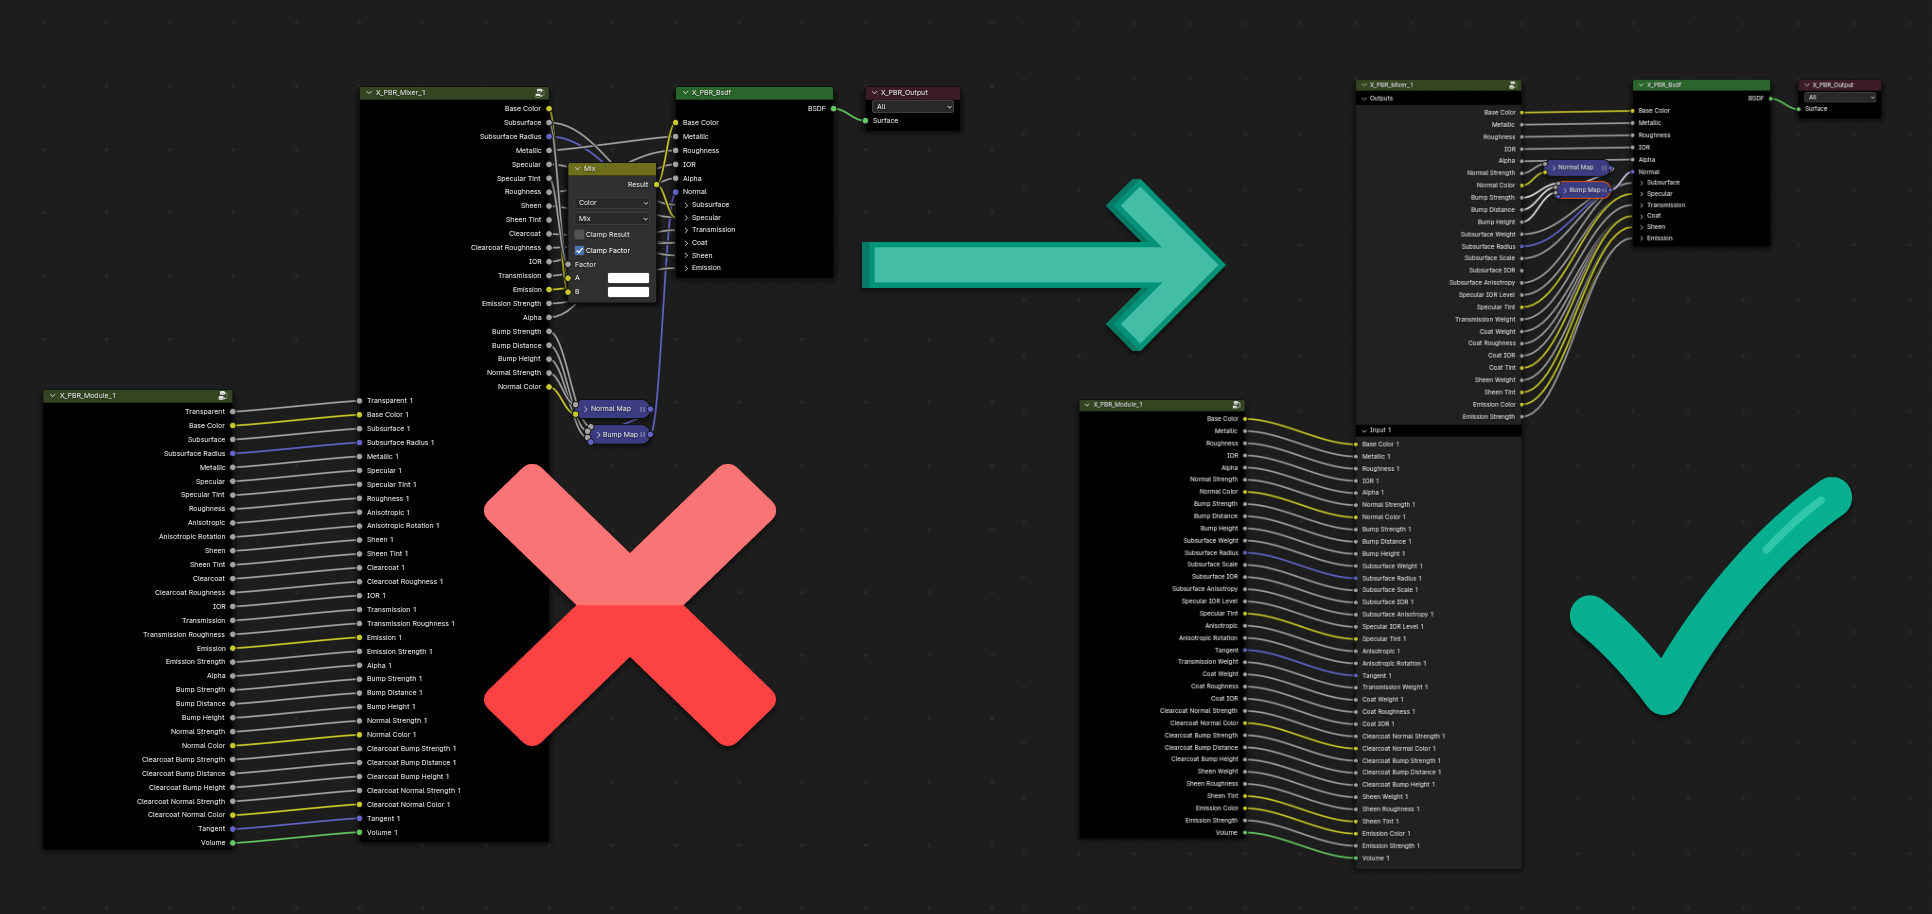
Between versions 3.x.x and 4.x.x of Blender the Principled BSDF node of Blender has changed, there are 2 ways to solve this problem, Extreme PBR will automatically recognize the version in use and will convert the materials in order to make them compatible with the version of Blender you are using.
Solution 1:
Select the object that contains the material, if the nodes present are not compatible select the material and press the Convert Module System button this button will convert all the materials present in the project to the system of nodes necessary to work correctly in the version you are using of Blender.
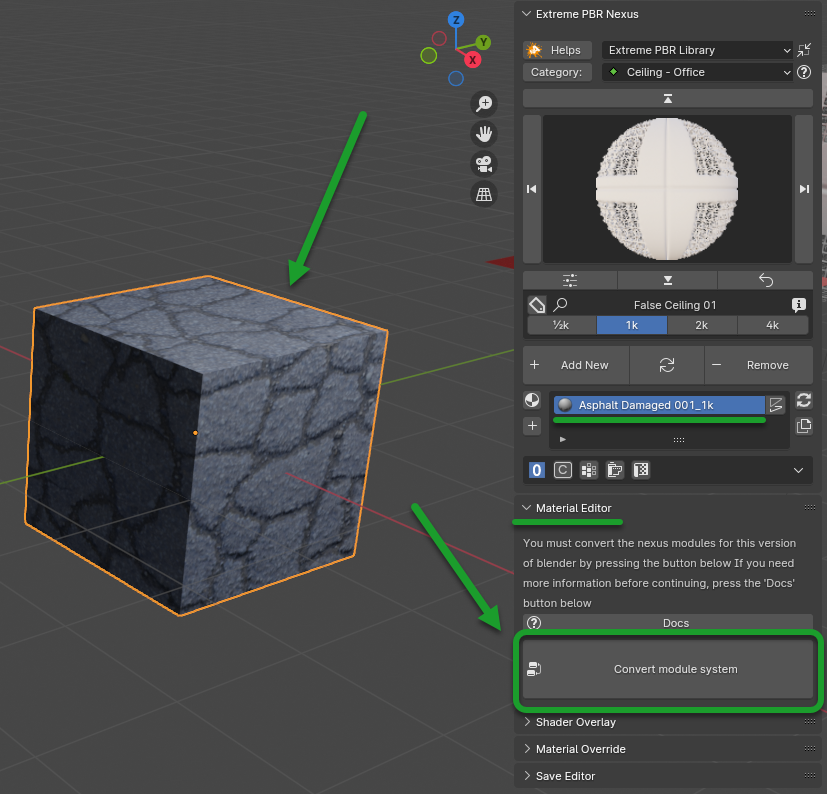
Solution 2:
Go to the Extreme PBR Options menu and press the Adjust all material node tree button this button will convert all the materials present in the project to the node system necessary to work correctly in the version you are using of Blender. Here is the reference to the indicated button Adjust All Material Node Tree
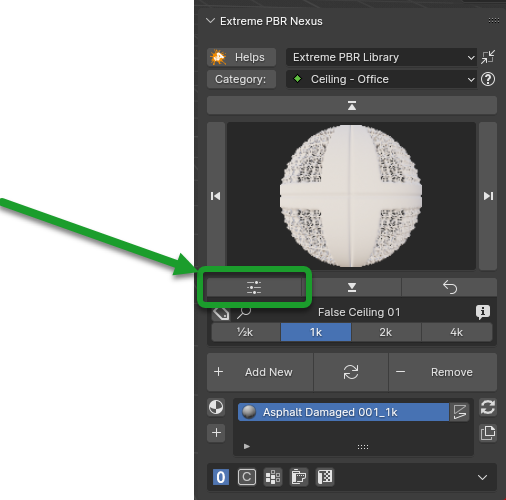
Why are the materials black sometimes?
This could depend on which version of Blender you are using, in particular if for example you used a New version of Blender or in Alpha or Beta version.
In the first case, if you created a project in Blender (For example in blender 3.5) and you opened the project in an older version of blender (For example Blender 3.0) it could happen that the materials are black. This depends on the fact that in Blender 3.5 there are new nodes that did not exist in blender 3.0, so it may have damaged the project.
This can be solved: Make sure you have a version of Extreme PBR 4.0.205 or higher and by going to “Options” from the Extreme PBR preferences menu and from there press the button “Adjust all material node tree” this should fix the nodes no longer recognized.
I have the library on One Drive, I can’t hook Extreme PBR to that library
First of all make sure that the synchronization is complete, as the files may not have been downloaded yet on your computer via One Drive.
And Pay attention to this:
One Drive shares files on the cloud, so they may not be physically on that path, so Extreme PBR will not be able to communicate with the files that are on the cloud, since it does not have access to the One Drive APIs. This is a known problem, but it doesn’t really depend on Extreme PBR or Blender. This should be handled so that the libraries are physically on your Hard Disk.
Important
In the 100% of the cases that have been reported to me, this problem is always related to the synchronization with One Drive so make sure you manage your files with your One Drive as best you can, because Extreme PBR only works if the files are really synchronized and present on your Hard Disk. Take a moment to check your One Drive situation carefully
I can’t find the paths of the libraries on my Nas
This is solvable simply by copying and pasting the paths into the address bar of your operating system’s file manager and then pasting them into the Extreme PBR library path text field.
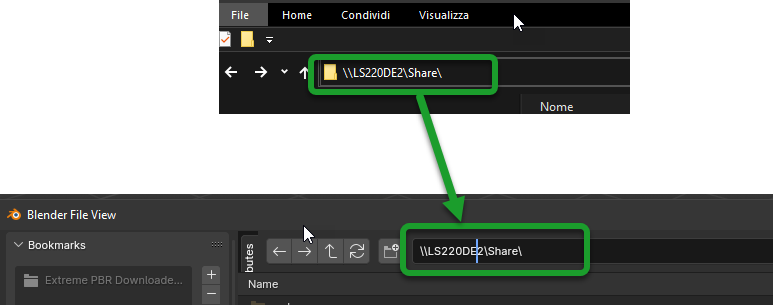
Material icons not visible
A problem is quite well known with the Blender Template Preview Icons, which in some situations may not be loaded correctly by the addon, to solve this problem a Button has been inserted which once pressed, reloads the Icons, making it possible to view them correctly. Here you will find the paragraph that indicates the button:Reload Preview Icons
How do I check the version of the addon?
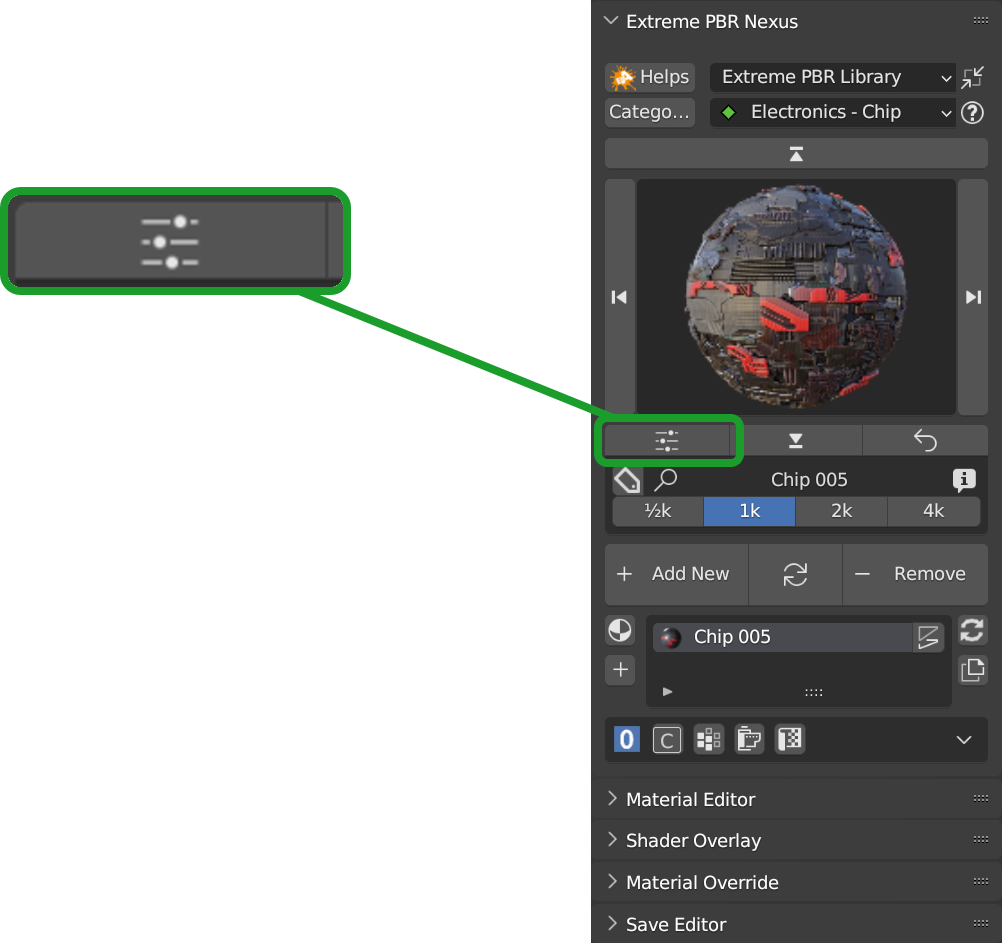
If the addon is installed, press the button that sends to the options, a popup will open directly on the addon preferences, where the version is also shown:
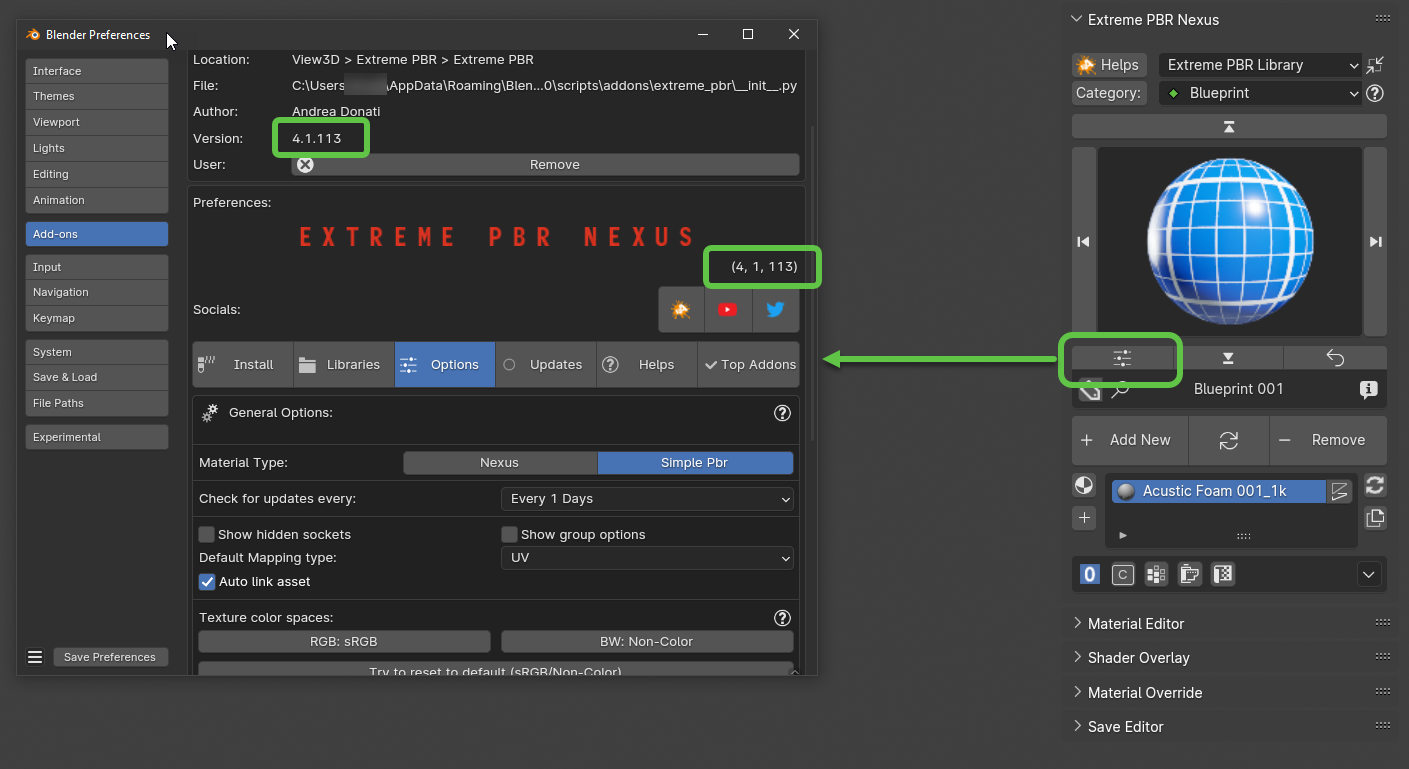
If the addon is not active, you can check the version of the addon by going to: Edit--> Preferences--> Addons
and looking for the addon Extreme PBR
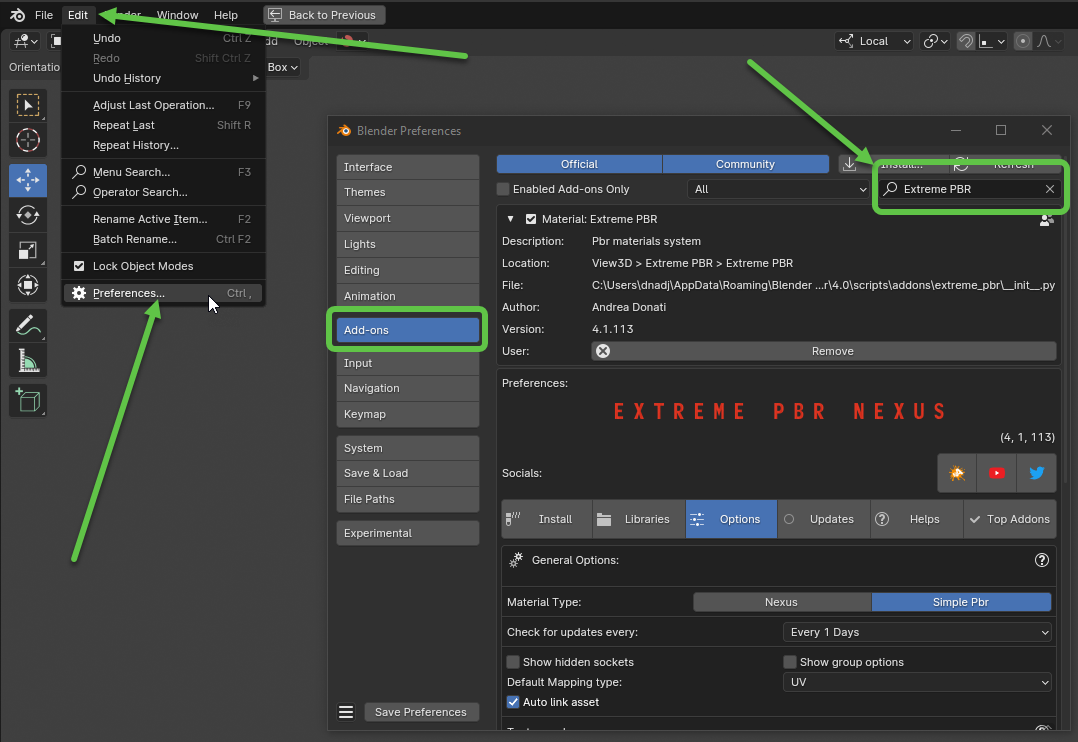
I get an error when activating the addon
Sometimes when installing a new version of Extreme PBR if we already had one installed previously, some modules Python could create conflicts, so it will not be possible to activate the addon.
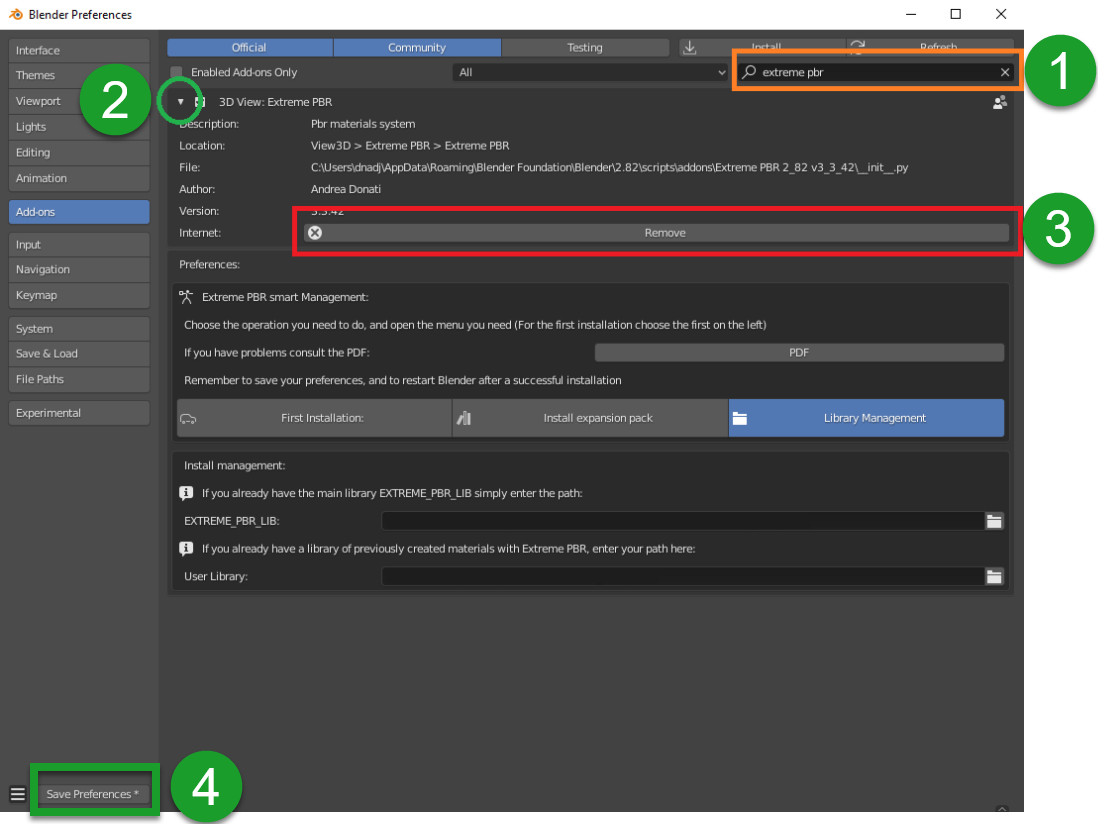
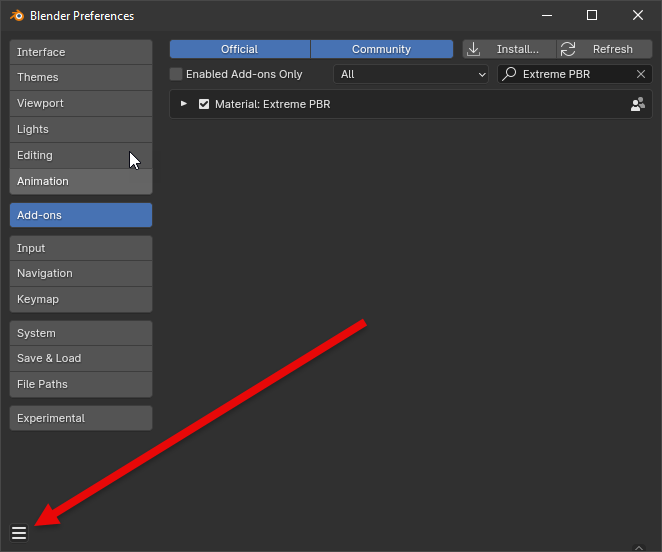
If this is your case (That is, you were updating to a newer version of the addon, follow these steps indicated below the image:
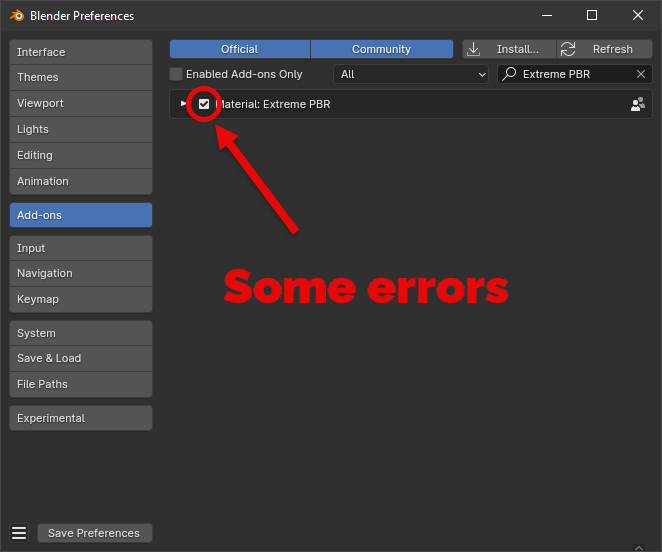
Step 3:
Close all Blender windows and reopen Blender
Step 4:
Reinstall the addon by following the update instructions: Update Only The addon
If this does not solve the problem, I invite you to contact me and report the error you receive, it could be a Bug How can I contact you for assistance?
Permission Error
In some cases the addon needs to write files, for example if you are installing the addon or saving
some settings, in some cases it may happen that the addon does not have permission to write the files, this
causes an error of this type: Python: Traceback (most recent call last) ....
This can be solved in this way:
- Windows
Close Blender, right click on the Blender icon and click on
Run as administrator
- Linux
Close Blender, here you will simply have to open Blender from the terminal with root permissions, so open the terminal you will only have to write
sudobefore the command to open Blender, so you will have to write something like this:sudo blender
I can’t get it to link correctly to the user library or other
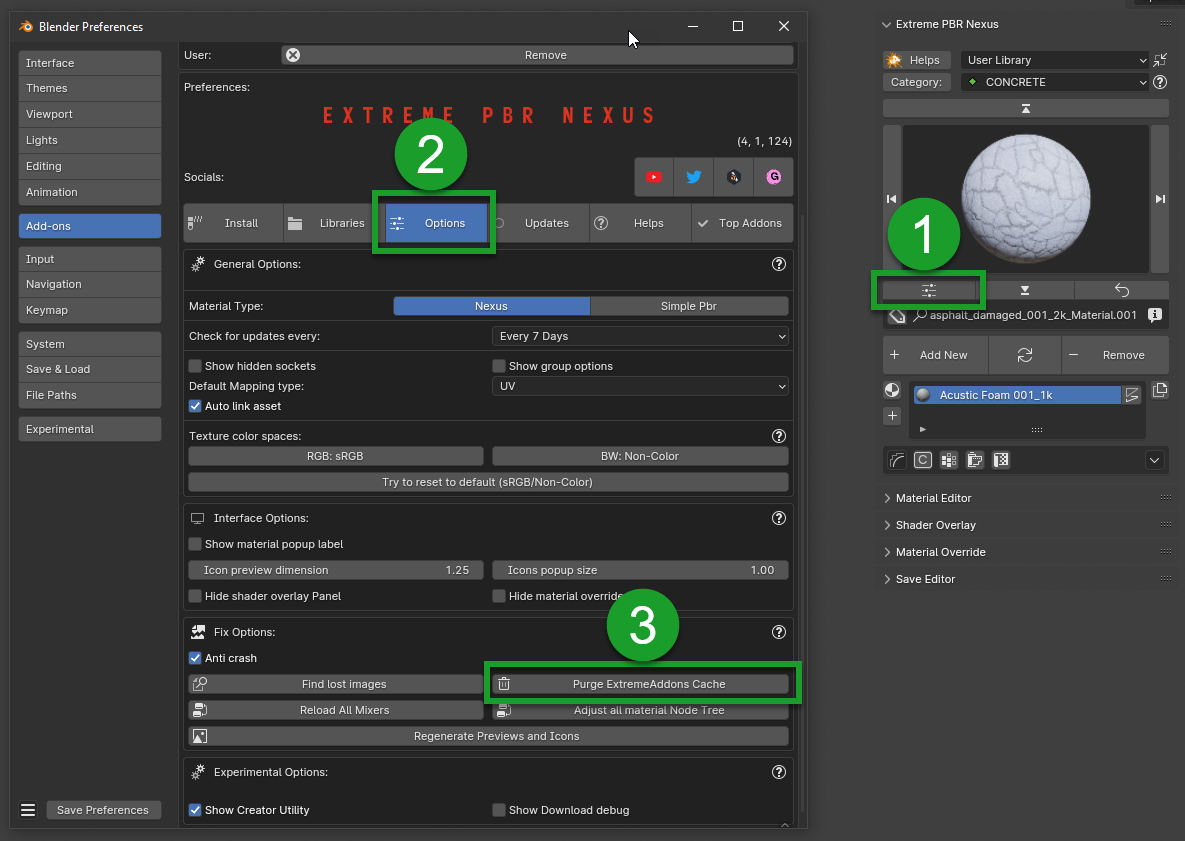
The addon sometimes automatically links to an old path of the user libraries, this can happen rarely, If this is happening, it could be that for some reason the old path is not overwritten by the new one in the storage system in the .json file created by Extreme PBR. To solve this problem, go to the Extreme PBR settings and press the “Purge Extreme Addons Cache” button
Then link the library path that was not remembered, and save the Blender preferences.
